
How to Grow Rutabaga from Seed to Harvest
You want to grow rutabagas at home? Great! I show you all you need to grow rutabagas from seed to harvest in a step-by-step approach.
Moreover, I also give you some additional general tips on how to grow rutabaga in the best possible manner at the end of this article.
I also added some videos of other gardeners to make this grower’s guide even more comprehensive. Enough talk, let it grow! 😉
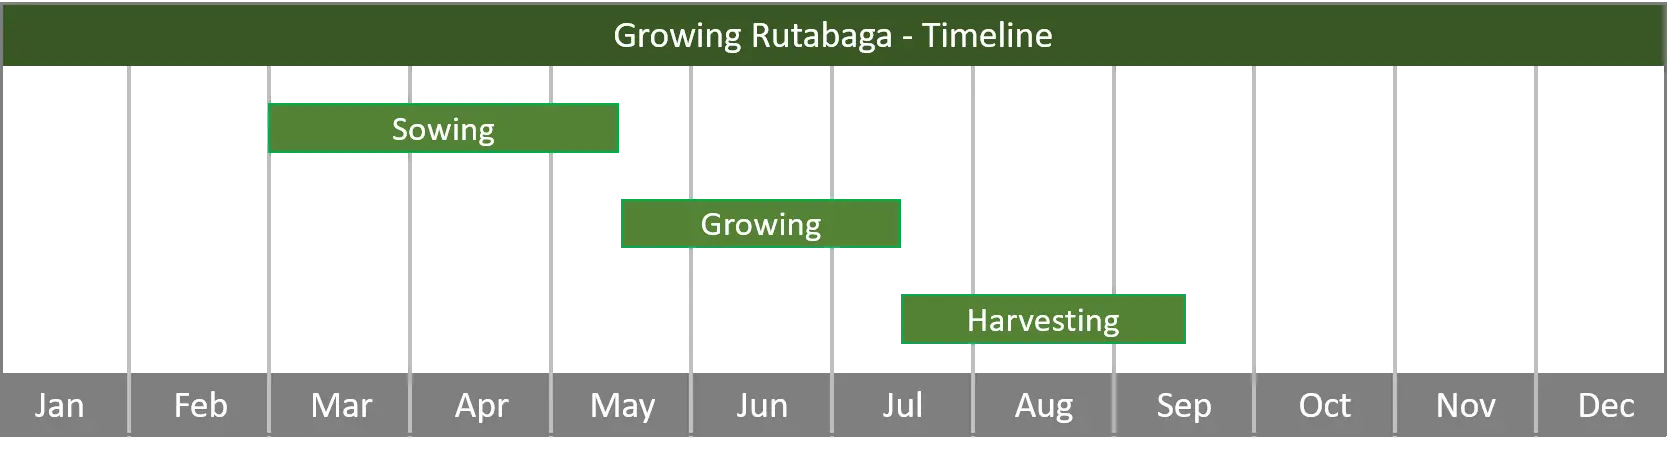
Table of Contents
Rutabaga Plant Profile
| Size | 1 – 2 feet tall, 2 feet spread. |
| Climate | Rutabaga growers best in moderate to cool climate zones with temperatures between 60 and 75 degrees Fahrenheit. |
| Sun Exposure | Although rutabaga likes cooler climates, it still loves the sun and you should provide as many hours of sunlight to your rutabaga plants as you can. |
| Soil Requirements | Rutabaga grows best in rather acidic environments with soil pH of 5.7 – 6.5. |
| Country of Origin | Rutabaga is native to Russia. |
| Growing Difficulty | Intermediate. Even though growing rutabaga can be done by beginners, it is important that you check out all the advice in this article so that you can grow your rutabaga plants in the best possible manner. |
| Perennial? | No, rutabaga is harvested in the first year of your growing project. |
| When should you start? | You can start indoors by planting rutabaga seeds around 4 to 6 weeks before you expect the last spring freeze. If you want to start directly outdoors, you should wait until you don’t expect spring freeze anymore. |
| Expected Yield & Harvest | You can harvest one crop per rutabaga plant 3 to 4 months after you planted the seeds. |
| What to do with it? | You can either roast it, mash it or use it for a rutabaga gratin. |
What Types and Varieties of Rutabaga can you grow?
First of all, you have to decide what rutabaga variety you want to grow. I listed the most popular ones for you below:
- Joan Rutabaga
- Laurentian Rutabaga
- American Purple Top Rutabaga
- Marian Rutabaga
- Collet Vert Rutabaga
- Navone Yellow Cabbage Turnip Rutabaga
- Champion a Collet Rouge Rutabaga
While I love growing Joan rutabaga due to its decent yield and its flavorful taste, you might have different preferences.
If you already know your favorite rutabaga variety, you can just get some seeds from your favorite rutabaga variety online or from your garden center.
However, if you don’t know what rutabaga variety you like most yet, I suggest you just grow different sorts of rutabaga so that you can pick your favorite one after your first year of growing and continue to grow it for many years.
Moreover, by growing more than one rutabaga variety, you can also make your growing project more interesting.
In fact, you will be surprised how many different shapes and colors rutabaga plants and crops can develop and this can be pretty nice to watch.
When should you plant Rutabagas?
The best time to start growing rutabaga is between March and April in most countries with moderate climatic conditions.
In general, if you want to grow your rutabaga seedlings indoors and transplant them outdoors later on, you should start between 4 and 6 weeks before you expect the last freeze.
If you want to directly plant your rutabaga seeds outdoors, you should start around 1 week before you expect the last freeze.
You can also start growing rutabagas in summer and harvest them in late autumn or winter.
However, I prefer the earlier starting date since I think that my rutabagas grow better due to that in my region.
How long does it take to grow Rutabagas from Seed to Harvest?
It will take between 70 and 100 days to grow rutabagas from seed to harvest.
However, please note that this also greatly depends on various different factors, including your individual skill level, the soil conditions you provide for your rutabagas, the overall climatic conditions and many more.
In fact, if you are still a beginner, it can even take you longer than 100 days to grow rutabagas from seed to harvest since you might make some mistakes during your growing journey.
However, don’t get discouraged if it takes you a little bit longer to grow your rutabagas.
For me, growing plants at home is not only about the yield, it’s about loving the process.
Hence, just enjoy the ride and if it takes you longer, who cares?!
This just means that you can also enjoy your growing experience for longer.
What is the best Climate to grow Rutabagas?
Rutabaga prefers moderate to cool climatic zones to grow in an optimal manner.
Thus, especially if you live in those cooler climates like in the Northern States of the US or in Northern Europe, you will have perfect conditions to grow rutabagas.
However, this doesn’t mean that you can’t grow rutabaga in warmer climates. It just means that it might take you longer to grow them and also that your yields may also be lower due to that.
What Temperatures does Rutabaga like?
Rutabagas grow best with daytime temperatures between 60 and 75 degrees Fahrenheit and nighttime temperatures between 50 and 65 degrees Fahrenheit.
However, please note that we are talking about optimal conditions here.
Even if you can’t provide those optimal temperatures in your home region, you will still be able to grow rutabagas in a decent manner if you follow all the steps in this article.
What Plants should you grow with your Rutabagas?
If you want to learn more about what plants to grow next to your rutabagas, make sure to check out the best and worst rutabaga companion plants.
What do you need to grow Rutabagas?
There is some equipment you need to grow rutabagas in the best possible manner. This includes:
- Growing bed (only necessary if you want to start growing rutabagas indoors and transplant them outdoors later)
- Flower pots (only necessary if you don’t have a garden to grow your rutabaga)
- Rutabaga seeds
- Fertilizer (you can also make your own organic fertilizer for which I give you the instructions below)
- Sticks and cord to stake your rutabagas
- Slug fence
- Watering can
- Garden shovel
- Potting soil
- Compost (optional)
- Passion and patience for growing rutabagas (mandatory) 😉
What Yield can you expect when you grow Rutabaga?
Each rutabaga plant will deliver one rutabaga crop.
Depending on the overall conditions you offer to your plants and the number of mistakes you will make during the growth process, you can either harvest quite big rutabagas or only tiny crops.
However, don’t be discouraged if your first yields will be rather small.
Chances are that you will get much better in growing rutabagas over time and you should enjoy the growing experience more than the actual end result.
Why should you grow your own Rutabaga?
There are many reasons why you should grow rutabagas at home.
While it might not make sense from a financial perspective, it can still be quite a lot of fun to grow rutabagas in your garden or on your balcony.
In fact, I really love growing rutabagas and other plants at home and gardening has just become a quite nice hobby for me.
Moreover, by growing your own rutabagas, you no longer have to buy rutabagas from your local grocery store.
Many people don’t know it, but a high fraction of vegetables and fruits that come from conventional agriculture are contaminated with harmful elements since they had been exposed to chemical pesticides and herbicides.
In turn, those vegetables can be rather bad for our health and if you want to stay healthy in the long run, chances are that you will be better off growing your own rutabaga since you have full control over the growing process and can grow your rutabagas in a completely organic manner.
Growing rutabagas can also help you to get more aware of how much work really has to be put into producing our food.
Many people just grab their food from the store without valuing it too much.
Consequently, plenty of food waste is produced each year.
By growing your own rutabagas, you will value your food much more and chances are that you will avoid food waste whenever possible.
As you can see, there are many reasons why you should grow rutabagas and other vegetables and fruits at home, even though it might be more work than just getting them from the store.
Growing Rutabaga: Step-by-Step
1. Select a Site for your Rutabaga
Now that you got some general information on how to grow rutabagas, we can get into detail regarding the actual planting process.
First of all, you have to select the optimal site for your rutabaga plants.
Does Rutabaga like Sun or Shade?
Rutabagas love the sun and if you can provide a spot with full sun all day long in your garden or on your balcony, this would be perfect.
However, this doesn’t mean that you can’t grow rutabagas without full sun.
You can also grow them in half-shady environments.
Just choose the sunniest spot you can offer for your rutabagas and you will be good to go.
What are the Soil Requirements of Rutabaga?
Rutabaga prefers slightly acidic environments and grows best with soil pH between 5.7 and 6.5.
Even if you are a little bit off this range, you will be just fine.
Just get some potting soil from your garden center and mix it with the soil in your garden.
You can also add some compost or natural fertilizer to the soil mix to make the soil even richer.
Just make sure that your soil will be loose enough and that it is well-drained so that no water puddles will occur which could potentially let the roots of your rutabaga plants rot.
How much Space do Rutabaga Plants need?
Rutabaga plants stay rather small and compact. Their crops also grow below the soil surface. Therefore, your rutabaga plants will not need too much space.
I suggest you plan around 1 square foot of space or each rutabaga plant so that the crops can develop in a healthy manner and your plants also get sufficient sun and don’t have to compete for nutrients with each other.
Of course, if you have a big garden and space is not a problem for you at all, you can also offer more space for your rutabaga plants.
The more space they get, the better they will grow and the bigger your yields will typically be.
Should you plant Rutabaga in a Pot or in your Garden?
Both options are possible. However, I recommend growing rutabagas in your garden instead of in pots since they will have more space to develop and the overall growing conditions will also be more natural.
Moreover, you can also grow many more rutabagas in your garden since you will simply have more space.
Of course, if you don’t have a garden and just live in a flat with a balcony, you will have no other choice than to grow rutabagas in pots.
However, in such a case, make sure that you use big pots so that your rutabaga plants can develop in a proper manner.
2. Plant Rutabaga Seeds
After selecting the perfect location for your rutabaga plants, it is time to get into the actual seeding process.
There are several questions related to this topic which I answer for you in the following.
Should you buy Rutabaga Seeds or Seedlings?
Since rutabaga seedlings are rarely offered by garden centers, you will often just have to raise your own seedlings. And this is not bad at all!
In fact, I almost always recommend raising your own seedlings instead of getting them from the store for various plants since it is just the first important step in the whole growing project.
If you don’t raise your own seedlings from scratch, you just don’t get the full growing experience.
Especially if you have never grown seedlings before, growing rutabaga seedlings can also be quite helpful for you since you can learn how to do it and transfer this knowledge to various other growing projects you might want to undertake in the future.
And it is also not difficult at all! In fact, I show you how to grow rutabaga seedlings step-by-step in the following chapters.
Should you buy Rutabaga Seeds or produce Seeds by yourself?
If you have never grown rutabaga before, you will just not be able to produce your own seeds since you can’t do it from the crops as you can for tomatoes, melons, pumpkins and so on.
You have to save rutabaga seeds from flowers and in the first year of growing, you will just not have the opportunity to do so.
Sure, after you finished your first rutabaga growing project, you can save some seeds and use them for many growing years to come.
But for now, just get some rutabaga seeds online or from your garden center and you are good to go.
How to plant Rutabaga Seeds
Now that you got your rutabaga seeds, it is time to plant them. If you want to grow your rutabaga plants directly outdoors, you can skip this step.
However, if you want to grow your rutabaga seedlings indoors and transplant them outdoors later on as I recommend you to do, just fill your growing bed with potting soil.
Place your rutabaga seeds onto the soil surface and make sure that each seed has at least 3 inches of space to each other.
Also make sure to plant more seeds than you want to get seedlings. Since some seeds will simply not germinate, I recommend planting 2 seeds for each rutabaga seedling you want to get.
After you placed all of your seeds onto the soil, cover them with an additional 1-inch soil layer.
Place your growing bed in a warm and bright spot inside your home to optimize the germination rate of your seeds. Water your growing bed and wait until you see the first results.
How long does it take to see the first Rutabaga Seedlings?
After one to two weeks, you should see the first rutabaga seedlings. Yet, please note that it can take up to one month until you see the full results.
If you haven’t produced enough rutabaga seedlings after one month, chances are that you will not see any new seedlings reaching the soil surface anymore and in such a case, you should plant some additional seeds into your growing bed.
How to protect your Rutabaga Seedlings indoors
As long as your rutabaga seedlings stay indoors in your growing bed, you don’t have to worry about protective measures too much.
In fact, your rutabaga seedlings will be perfectly safe indoors since they will not be attacked by snails and other animals like in the outside world.
However, if you have pets, you should make sure that they are not able to reach your growing bed. 😉
When should you transplant your Rutabaga Seedlings?
After around one month in your growing bed, your seedlings will be ready to be transplanted outdoors.
I personally like to transplant my rutabaga seedlings outdoors when the two following criteria are met.
First, my rutabaga seedlings should have a minimum height of at least 4 inches.
This is necessary since outside conditions can be pretty harsh and your seedlings need a minimum level of resistance for that.
The bigger your rutabaga seedlings, the higher the chance that they will make it outdoors.
Second, also the climatic conditions should be suitable to transplant your rutabaga seedlings outdoors.
While rutabaga plants tolerate some frost, I personally like to wait until the last freeze in spring is over before I transplant them outdoors.
If both criteria are met, it is time to prepare your growing site before you can actually transplant your rutabaga seedlings. For that, just dig a big hole in your garden.
This hole should be around 1 foot deep. Depending on the number of rutabagas you want to grow, you should adjust the size of the hole.
I suggest you plant one rutabaga per square foot. For example, if you grow 20 rutabaga plants, make sure that the hole has a size of 20 square feet.
After you have dug this hole, fill it with a mix of potting soil from the store and the soil from your garden.
If you want to make the soil richer, you can also add some fertilizer or compost to the soil mix.
After you have filled the hole with the soil mix, transplant each rutabaga seedling to the growing site and leave around 1 foot of space between each other.
After you have transplanted all of your seedlings, water them and you are good to go.
If you want to grow rutabaga in a pot instead of in your garden, just fill your pots with potting soil from your garden center and place your rutabaga seedlings there.
What kind of Protection do Rutabaga Seedlings need outdoor?
After transplanting your rutabaga seedlings outdoors, they are no longer protected by your growing bed and by your four walls.
Therefore, it is time to add some additional protective measures to your rutabagas.
While there are some chemical measures to keep away slugs and other unwanted animals, I am not a big fan of using those chemical substances at all.
In fact, those substances can greatly harm the environment as well as your soil in the long run.
Consequently, instead of using chemical substances to protect your rutabagas, I recommend you use simple but effective slug fences.
You can also install bigger fences if you want to keep away bigger animals as well.
By using those fences, there is no need to apply any chemicals and you can make your growing project as eco-friendly as possible due to that.
3. The Rutabaga Growth Process
Now that you transplanted and protected your rutabaga seedlings, you have already done most of the manual work.
If you got to this point, congratulations! I know it takes plenty of effort to grow rutabaga at home.
However, if you enjoy growing plants as I do, it should not feel like work but rather like a nice hobby.
In the following, I answer various questions regarding the future growth process.
Should you prune your Rutabagas?
Since rutabaga plants stay rather small and don’t develop too much plant material, there is no need to prune your rutabaga.
In fact, by pruning your rutabagas, you can do more harm than good since you will take away some power from your plants, which in turn can lead to lower yields.
Hence, just let it grow and let nature do its work.
Do you have to pollinate your Rutabaga Plants by Hand?
No, there is no need to pollinate your rutabagas by hand.
You don’t have to take any manual action in this regard.
Should you stake your Rutabaga?
Since rutabagas stay rather small and compact, it will not be urgently necessary to stake your plants. However, you can still do so if you want.
If you want to stake your rutabagas, just get some bamboo sticks and anchor them around 5 inches away from each plant.
Tie each plant with cord to one bamboo stick and you are good to go.
4. The Rutabaga Harvest
After closely following all the steps in this rutabaga grower’s guide, you should be able to harvest pretty decent yields when the time has come.
When should you harvest your Rutabaga?
Since you will see the tops of your rutabaga crops, it will be quite easy to determine the optimal time to harvest them.
You just have to wait until the diameter of the tops of your rutabagas reaches around 4 inches in diameter.
Of course, you can also harvest them a little bit smaller or bigger.
However, I would not harvest them smaller than 3 inches in diameter since this would just be a waste of yield in my opinion.
How should you store Rutabaga?
Once you harvested your rutabagas, make sure to store them in a dark and cool spot inside your home. If you store them correctly, they can last for a few weeks or even months.
However, like many other vegetables and fruits, they taste best and also contain the highest amount of nutrients right after the harvest.
Hence, make sure to use your rutabagas as soon as possible to get the most out of them.
What should you do with your Rutabagas?
There are many different dishes you can create from your rutabagas. While you can just roast them, you can also make mashed rutabagas or make a rutabaga gratin out of them. It is up to you what you want to do with your rutabagas.
After all, you did all the work and therefore, you should be the one to decide what to do with the fruits of your labor 😉.
Rutabaga Plant Care Tips
Now that you got the step-by-step on how to grow rutabaga from seed to harvest, you already got the most valuable information of this article. However, there are still some things to talk about.
How often should you water Rutabaga?
I suggest you water your rutabaga plants on a regular basis.
While your rutabagas will only need little amounts of water when they are still young, their water demand will increase substantially once they get bigger.
Of course, this also depends on the outside conditions.
If temperatures are quite high and there had been no rain for several days, chances are that you have to irrigate your rutabagas every day.
If it is cool outside and also quite rainy, there will often be no need to water your plants.
Hence, just have a look at the outside conditions and you will know most often when it is time to water your plants.
If you are not sure whether it is time to water your rutabagas or not, you can use the following trick.
Just dig a small hole with your finger into the ground next to your rutabagas and pull it out again.
If soil sticks to your finger, this means that the soil is still wet and there is no need to water your plants right now.
If no soil sticks to your finger, this means that the soil is dry and that you should water your rutabaga plants as soon as possible.
You can also have a look at the leaves of your rutabaga plants.
If those leaves begin to hang, this is a sign that they need water most of the time.
At what Time of the Day should you water your Rutabaga Plants?
The best time to water rutabaga is usually in the early morning. However, don’t stick to this exact time of the day too much.
In my opinion, it is much better to water your rutabaga plants whenever they need water instead of relying on a fixed schedule.
How often should you fertilize your Rutabaga Plants?
If you prepared the soil mix as mentioned earlier in this article and you also added some fertilizer in the beginning, there will be no need to add additional fertilizer most of the time.
Just give your plants enough space and rich soil to grow and you will be just fine.
In fact, too much fertilizer can do more harm than good since it can burn the roots of your plants.
What kind of Fertilizer should you use for your Rutabaga Plants?
If you still come to the conclusion that you want to fertilize your plants, make sure to use natural fertilizer instead of chemical alternatives.
While those chemical fertilizers work quite well, they can seriously damage the soil and can also hurt the local flora and fauna.
Hence, just order a natural fertilizer online or get it from your local store.
If you want to make your own organic fertilizer, just go to your local meadow or forest and collect some stinging nettles.
Put them in a bucket full of cold water and wait for three days. After this period of time is over, just remove the plant material. You just created your own fully organic fertilizer, congrats! 😉
From now on, you just need to add some of the stinging nettle liquid to your watering can and you will be good to go.
Of course, you can use this stinging nettle liquid not only for your rutabagas, but also for several other plants in your garden or on your balcony.
Should you use Pesticides or Herbicides for Growing Rutabaga?
Stinging nettle liquid is not only a great fertilizer, but it is also a great pesticide.
In fact, most pests don’t like the taste of stinging nettle liquid at all and after you sprayed some of your stinging nettle liquid onto your rutabagas, chances are that those pests will vanish quite quickly.
There is also no need to use chemical herbicides. Instead of using those unhealthy substances for your growing project, just remove weeds by hand.
If you want to learn more about rutabaga pest control, also feel free to have a look at how to control rutabaga pests and plant diseases.
What’s left to say?
First of all, I am really proud of you if you made it to the end of this extensive rutabaga grower’s guide.
I know it was quite a long article, but I had to make it such long to provide you with all the information your need to grow rutabagas from sowing to harvest in the best possible manner.
I hope you got some value out of this article. If so, make sure to also share it with your family and friends.
If you want to learn even more about growing rutabaga, feel free to also check out my growing rutabaga FAQ section.
Sources
https://en.wikipedia.org/wiki/Rutabaga
https://www.goodhousekeeping.com/health/diet-nutrition/a20706455/rutabaga-recipes/
https://homeguides.sfgate.com/types-rutabaga-34444.html
About the author
My name is Andreas and I’m really passionate about our environment and also about growing plants. In fact, I have grown several different plants over many years. I love to see my own plants grow and always try new things.
In my blog posts, I want to share my experiences with you so that you can become successful in growing various different plants, even if you are still a beginner right now.