
How to Grow Collard Greens from Seed to Harvest
You plan to grow collard greens at home? Good news! It can be quite a lot of fun and you can also produce pretty decent yields.
However, before you start, make sure to read my collard greens grower’s guide since I give you all the information on how to grow collard greens from seed to harvest in the best possible manner.
I also included some videos of other gardeners to make this article even more comprehensive for you. Enough talk, let it grow! 😉
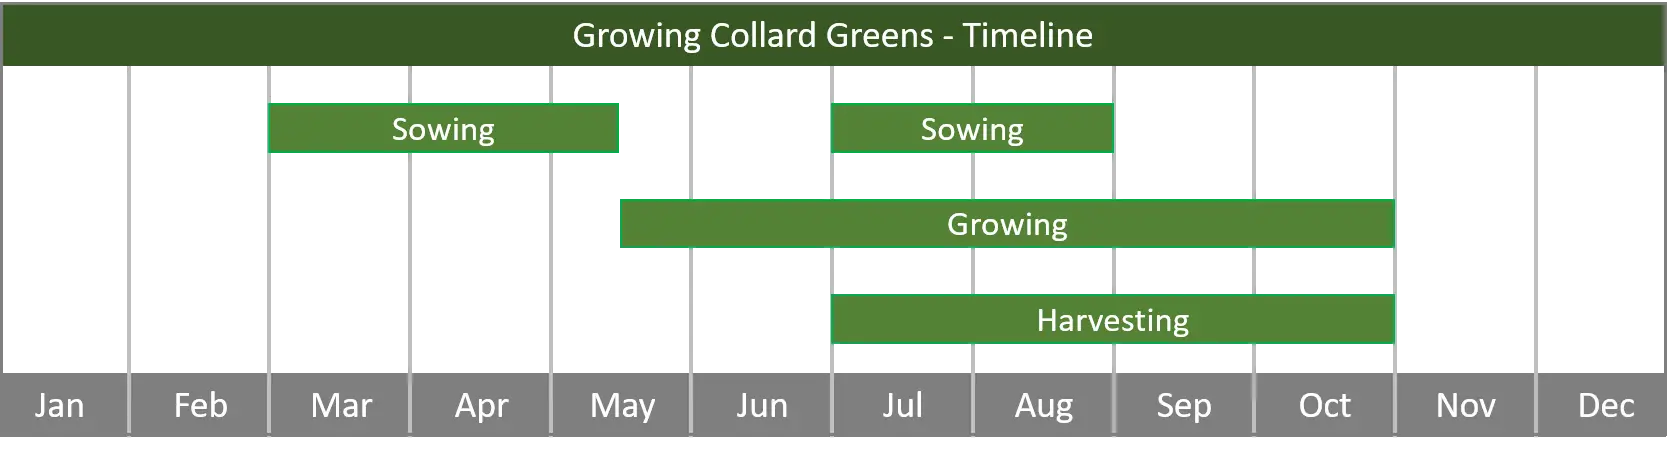
Table of Contents
Collard Greens Plant Profile
| Size | 2 – 3 feet tall, around 2 square foot spread. |
| Climate | Collard greens usually grow best in cool or moderate climatic zones. However, they are pretty resistant and also grow in warmer climates as long as conditions are not too extreme. Collared greens prefer temperatures between 50 and 70 degrees Fahrenheit to grow in an optimal manner. |
| Sun Exposure | Collard greens grow best if you provide them with many hours of full sun each day. |
| Soil Requirements | Collard greens grow best with soil pH between 6.5 and 7, meaning that they prefer slightly acidic environments. |
| Country of Origin | Eastern Mediterranean. |
| Growing Difficulty | Intermediate. If you are new to growing collard greens, you should definitely check out all the information in this article to grow your collard greens in an optimal manner. |
| Perennial? | No, collard greens are usually harvested in the first year. |
| When should you start? | You should start growing collard greens indoors around 4 to 6 weeks before you expect the last spring frost. If you want to start directly outdoors, you can plant seeds around 1 week before you expect the last spring freeze. |
| Expected Yield & Harvest | While you will only harvest one head per plant, those heads can be pretty heavy and can last for many meals. |
| What to do with it? | Apart from many different salads, you can also make pesto or soups out of your collard greens. |
What Types and Varieties of Collard Greens can you grow?
In the first step of your collard greens growing project, you have to decide which collard green variety you want to grow.
For that reason, I listed the most popular types of collard greens for you below:
- Ellen Felton Dark
- Old Timey Blue
- Morris Heading
- Champion
- Georgia
Due to the relatively short growing time, the nice taste and the decent yields, I personally like to grow Champion collard greens. However, this is just me and tastes are different.
You should therefore not solely rely on my recommendation, but rather grow a few different collard green varieties to figure out which ones you like most since you then can grow your favorite collard green varieties for many years to come in the future.
Moreover, it is also just much more interesting to grow different varieties of collard greens compared to just growing a single one since you will get plants of many shapes and colors.
Hence, especially if this is your first collard green growing project, I highly recommend you just grow a few different types of collard greens.
When should you grow Collard Greens?
You can either start growing collard greens in spring for a summer harvest or in summer for a fall harvest.
If you want to start growing collard greens in spring, you should start 4 to 6 weeks before the last spring frost.
In most regions with moderate climate, this will be between the end of March and Mid of April.
However, this is only true if you grow your collard green seedlings indoors and transplant them outdoors later.
If you want to start directly outdoors, you should start planting your seeds around one week before you expect the last spring frost.
If you want to start growing collard green in summer, plant them 8 to 10 weeks before you expect the first autumn frost.
For most moderate climatic zones, this should be between July and August.
How long does it take to grow Collard Greens from Seed to Harvest?
It will usually take between 60 and 80 days to grow collard greens from seed to harvest.
However, this depends on various factors, including the soil conditions you provide for your plants, the amount of sun they get, the climatic conditions in your regions and also your skill level in growing plants at home.
While an experienced gardener may be able to grow collard greens from sowing to harvest in less than 60 days, it might take you even more than 80 days to do so if you are still new to gardening.
However, don’t be discouraged if it takes you longer than expected to grow your collard greens.
Growing plants at home is not about speed, it is about loving the process.
Consequently, the longer it takes you to grow your plants, the longer you can enjoy your growing experience! 😉
What is the best Climate to grow Collard Greens?
Collard greens grow best in moderate to cool climatic zones. However, this doesn’t mean that you will not be able to grow collard greens in warmer climates.
It just means that it might take you longer if you can’t provide optimal conditions for your plants and also that your yields tend to be lower due to that.
If you live in a warmer climatic zone, just make sure that you start growing your collard greens pretty early in spring to provide your plants with cool conditions early on in the year.
What Temperatures do Collard Greens like?
The best temperature to grow collard greens is between 50 and 70 degrees Fahrenheit.
However, collard greens also tolerate lower and higher temperatures as long as swings in temperature are not too extreme.
What Plants should you grow next to your Collard Greens?
If you want to learn more about what plants you should grow near collard greens, make sure to check out the best and worst collard green companion plants.
What do you need to grow Collard Greens?
For growing collard greens, you will need some equipment which I listed for you below:
- Growing bed (to grow your collard greens seedlings, only necessary if you don’t grow your collard greens directly outside)
- Flower pots (only necessary if you don’t have a garden to grow your collard greens)
- Collard green seeds
- Fertilizer (you can also make your own organic fertilizer for which I give you the instructions below)
- Potting soil
- Slug fence
- Watering can
- Garden shovel
- Soil pH test kit (optional)
- Garden lime (optional)
- Compost (optional)
- Passion and patience for growing collard greens 😉
What Yield can you expect when you grow Collard Greens?
Although you will only get one head of collard greens per plant, those heads can get pretty big and if you follow all the steps in this article, chances are that you will be able to produce pretty decent yields.
This is especially true if you plant many collard green plants in your garden. In such a case, chances are that you will even be able to give away some of your yields to family and friends.
Why should you grow Collard Greens at home?
Even though it might not make sense to grow collard greens from an effort and also from a purely financial perspective, there are still some arguments why you should plant collard greens at home.
First of all, growing collard greens in your garden or on your balcony can simply be quite a lot of fun.
I personally really love growing my own vegetables and fruits at home and it has become a quite nice hobby for me.
Growing collard greens can also help you to lower your stress level.
Especially if you work in a demanding office job for long hours every day, chances are that you need some contrast to stay mentally healthy in the long run.
Gardening is perfect for this since it is completely different from your work and can also slow down your daily life quite a lot.
In turn, growing collard greens at your home can help you to relax and to unplug from your stressful daily life.
Moreover, by growing your own collard greens at home, you also no longer have to rely on collard greens from your store which are often contaminated with harmful chemicals from pesticides and herbicides.
Chances are that your health will also thank you for that in the long run.
As you can see, there are many advantages to growing collard greens at home and I hope I convinced you that it is indeed a good idea to do so 😉.
Growing Collard Greens: Step-by-Step
1. Select a Site for your Collard Greens
Now that you know why you should bother with growing collard greens at home, it is time to get into the actual planning process for your growing project.
The first important step in this regard is to select the perfect site for your collard greens.
Do Collard Greens like Sun or Shade?
Although collards like moderate to cool climatic zones, they still like sunny growing environments. Hence, if you can provide full sun for your collard greens, it would be perfect.
However, collard greens also grow well in half-shady environments and you should not be discouraged if you can’t provide full sun all day long in your garden or on your balcony.
Just choose the sunniest spot you can offer your collard green plants and you are good to go.
What are the Soil Requirements of Collard Greens?
Collard greens grow best in fertile soil with a soil pH between 6.5 and 7. While some potting soils fulfill those requirements, others are a little bit more acid.
Hence, make sure that you get the right potting soil from your garden center to grow collard greens in an optimal manner.
If the potting soil from your store is still too acid, you can also add some garden lime to the soil mix to raise the soil pH and therefore to lower the acidity level.
If you are not sure if the soil mix has the right pH, you can also use a test kit that you can get online.
You can also add some compost or natural fertilizer to the soil to make it even richer in nutrients.
Moreover, also make sure that the soil is loose and well-drained so that no water puddles can form which could let the roots of your collard greens rot.
How much Space do Collard Green Plants need?
Collard greens grow quite bushy and therefore need plenty of space. I suggest you plan at least 4 square feet of space for each collard plant you want to grow.
Of course, feel free to provide even more space to your plants if space is not a limiting factor for you in your garden.
The more space your collard greens get, the better they will develop and the higher your yields tend to be.
Should you plant Collard Greens in a Pot or in your Garden?
Since collard greens get quite bushy and need plenty of space, I would not recommend growing them in a pot. Instead, if you have a garden, just grow them there.
If you don’t want to directly grow your collard greens in your garden, you could also use a raised bed instead.
Of course, if you live in a flat with a balcony and don’t have a garden, you will just have no choice other than to grow your collard greens in pots.
In this case, at least make sure that you use quite big pots so that your collard greens get sufficient nutrients and can grow in a decent manner.
2. Plant Collard Green Seeds
After you selected the optimal site for your collard greens, it is now time to discuss everything you need to know regarding the actual seeding process.
Should you buy Collard Green Seeds or Seedlings?
The first thing you have to decide in this regard is whether you want to buy collard green seedlings from your garden center or raise your own seedlings instead.
I think it is much better to raise your own collard green seedlings since only then will your growing experience be really complete.
In fact, growing seedlings from seed is the first important step for every growing project and you should just not miss out on this important step.
It is also much easier than you might think and I will show you how to grow collard green seedlings from seed in the following chapters.
Should you buy Collard Green Seeds or produce Seeds by yourself?
Since collard green seeds are saved from flowers and not from crops, there is simply no chance to produce your own collard green seeds if you have never grown collard greens before.
Of course, after you completed your first collard green growing project, you can save seeds for many growing years to come if you want to.
However, for now, just get some collard greens seeds online or from your garden center and you will be good to go.
How to plant Collard Green Seeds
After you got seeds of your favorite collard green varieties, it is time to actually plant those seeds.
You can start in spring by planting collard green seeds either indoors and transplant them outdoors later on or by directly planting your seeds outdoors.
I personally prefer growing my collard green seedlings indoors since I can start earlier in the year and my seedlings will also be better protected compared to directly planting them outdoors.
If you follow my advice, just fill your growing bed with potting soil from the store. After that, place your collard seeds onto the soil.
Make sure that you leave at least 4 inches of space between each seed so that your collard green seedlings will have enough space and will be able to develop in a healthy manner.
Also make sure that you plant more seeds than you expect to get seedlings. Some seeds will just not germinate and will rot in the soil instead.
A good ratio between seeds and the required number of seedlings is 2:1. By following this ratio, you can be pretty sure to reach your goal.
After you placed all of your seedlings onto the soil in the growing bed, just cover them with an additional soil layer of 1 inch in height. Water your growing bed and you will be good to go.
If you don’t want to start growing collard greens in spring but want to start growing them in summer for a fall or winter harvest, there will be no need to raise your seedlings indoors and you can just directly plant your collard green seeds outdoors in this case.
How long does it take to see the first Collard Green Seedlings?
After planting your seeds, you should expect to see the first collard seedlings after one week.
However, don’t get disappointed if it takes you a little bit longer to see the first results.
In fact, the more soil you cover your seeds with, the longer it will take for your seedlings to reach the soil surface. Just stay patient and let nature do its work.
After around one month, you should no longer expect any new collard seedlings reaching the soil surface and if you haven’t produced enough seedlings at this point, you should plant additional collard seeds into your growing bed.
How to protect your Collard Green Seedlings indoors
By growing your collard green seedlings indoors in your growing bed, they are already properly protected and you don’t have to add any additional protective measures.
Just make sure that your pets cannot reach your growing bed if you have some and you will be good to go.
When should you transplant your Collard Green Seedlings?
During the next weeks, your seedlings will get bigger and stronger and at one point, the time will come to actually transplant your seedlings outdoors.
For me, it is time to transplant my collard green seedlings outdoors when both of the following criteria are met. First of all, there should no longer be any frost outside.
While your collard seedlings will tolerate cool weather, they are still rather sensitive to freeze and you should avoid exposing them to it at all cost.
Moreover, you should also make sure that your collard seedlings have a certain minimum size before transplanting them outdoors. I personally wait until they reach a height of at least 5 inches.
If both the climatic and the size criteria are met, it is time to prepare your growing site before you can actually transplant your seedlings to your garden.
For that, just dig a big hole in your garden which is around 1 foot deep. For each plant, calculate around 4 square feet of space.
For example, if you want to grow 10 collard greens, you should prepare a growing site with around 40 square feet of space in your garden.
After you dug this hole, just fill it with a mix of potting soil from the store and the soil from your garden.
You can also add some garden lime, natural fertilizer or compost to the soil mix to make it even richer and to balance the soil pH.
After you filled this big hole with the soil mix, just transplant your collard seedlings to your growing site.
Make sure that you plant your collard greens in rows. Make sure that each row has at least 1 feet of space to each other and that each plant in the same row also has 1 feet space to each other.
After transplanting all your seedlings accordingly, just water them and you are done.
Alternatively, if you want to grow your collard greens in pots, just fill your pots with potting soil and transplant one seedling into each pot.
What kind of Protection do Collard Green Seedlings need outdoor?
After transplanting your seedlings outdoors, they will no longer be protected by your growing bed and will be a target for slugs and other animals that will try to feed on them.
Fortunately, there is a simple but yet effective measure to keep away those unwanted attackers. You just need to get a slug fence and install it.
If you want to also deter bigger animals, you can install a second bigger fence if you want to add even more safety to your plants.
By using those measures, your collard greens will be pretty safe outdoors and there will be no need to use any chemicals to protect your plants.
I know that some gardeners use those chemicals, yet they are often extremely harmful to our environment and I recommend you just use slug fences instead.
3. The Collard Green Growth Process
Now that you transplanted and protected your collard greens, the hardest part is already done. Now it is time to wait and to let nature do its work.
In fact, there is not too much manual work you have to put into your growing project once you have reached this point.
However, there are still some things to consider for the further growth process which I want to show you in the following.
Should you prune your Collard Greens?
No, you should not prune your collard greens. While some people claim that pruning collard is a good idea, I don’t agree with this at all.
In fact, since you harvest the plant material later on in the year, pruning your collard greens can vastly lower your yields.
Hence, just let it grow and don’t prune your plants since you can do much more harm than good.
Do you have to pollinate your Collard Green Plants by Hand?
No, there is no need to pollinate your collard greens by hand. Just let it grow and let nature do its work.
For collard greens, no pollination is required at all since you will harvest the plant material instead of crops.
Should you stake your Collard Greens?
Since collard greens grow rather bushy and compact, there is no need to stake or stabilize them.
Collard greens will anchor their roots deep into the soil and will be able to resist normal winds without any additional staking measures from your side.
4. The Collard Green Harvest
After a few months from sowing have passed, it will be time to harvest your collard greens.
When should you harvest your Collard Greens?
There is no perfect point in time of when to harvest collard greens.
While you can harvest the tender baby leaves, you could also wait longer until those leaves have gotten bigger if you want to increase your overall yields.
Thus, depending on your preferences, you have plenty of discretion regarding when to harvest your collard.
I personally like to let the leaves of collard greens grow until they reach a decent size so that I get enough plant material out of them.
However, I would not suggest waiting until the leaves exceed a size of 10 inches since they will become rather stringy if they get too big.
You also don’t have to harvest your collard greens all at once.
You can just harvest the big leaves and let the smaller ones grow for a few more days.
By doing so, you can harvest fresh collard greens for many weeks or even months.
How to store your Collard Greens?
The best way to store collard greens is to just put them into the freezer since most nutrients will be preserved by doing so.
However, it is still better to eat your collard greens right after you harvested them since they will simply taste the best at this point in time.
What should you do with your Collard Greens?
While you could just use your collard greens for many different types of salads, you could also use them for soups or pesto.
If you are a rather curious person who wants to try new things, you could also invent your own collard green recipes and share them over social media and with your family and friends.
Collard Greens Plant Care Tips
After providing you with all the information that is needed to grow collard greens from seed to harvest, I want to give you some more general information to complete this collard grower’s guide in the following.
How often should you irrigate Collard Greens?
While your collard greens will not need much water in the beginning when they are still small, their water demand will increase exponentially over time.
Of course, this also depends on the overall climatic conditions.
When it is cool outside, your plants will need far less water than if it’s hot.
Also if there is plenty of rainfall, you will not have to water your collard greens at all if you grow them in your garden.
If you are not sure whether it is time to water your collard greens or not, just have a look at the leaves of your plants.
If those leaves begin to hang, this is often a clear indication that your plants need water.
You can also dig a small hole next to your plants and feel if the soil is still wet.
Over time, you will get a pretty good intuition regarding when it will be time to water your plants due to gains in experience.
At what Time of the Day should you water your Collard Green Plants?
While the best time to water your collard greens is arguably in the early morning, I personally haven’t seen much difference between watering them in the morning, at lunchtime or in the evening.
Thus, I recommend you just water your collard plants on a regular basis and at the time that fits best with your schedule.
How often should you fertilize your Collard Green Plants?
If you have already provided a healthy and rich soil mix for your plants once you transplanted them outdoors, there will be no need to add any additional fertilizer to your collard greens.
In fact, using too much fertilizer can even do more harm than good since it can burn the roots of your plants.
What kind of Fertilizer should you use for your Collard Green Plants?
If you still want to use additional fertilizer for your own reasons, make sure that you use organic fertilizer instead of chemical alternatives since those chemicals can be pretty harmful to our environment.
You can order organic fertilizer online or just produce your own natural fertilizer.
You just need to collect some stinging nettles from your local meadow, put them in a bucket and fill the bucket with water.
Just wait for three days and remove the plant material after that.
You just produced a nice natural fertilizer that you can just add to the water in your watering can and fertilize your plants on a regular basis with it.
Should you use Pesticides or Herbicides for Growing Collard Greens?
Similar to chemical fertilizers, I am also not a big fan of using chemical pesticides and herbicides since they can be extremely harmful to our local flora and fauna.
Instead of using chemical pesticides, just use the stinging nettle liquid mentioned above and stray it onto your collard greens.
Most pests don’t like the taste of stinging nettle liquid at all and you will be surprised how well it works.
There is also no need to use chemical herbicides since you can just remove weeds by hand.
If you want to learn more about pest control, also make sure to have a look at how to get rid of collard pests and diseases.
What’s left to say?
First of all, thanks for reading this extensive collard green grower’s guide to the end.
I know it can be pretty exhausting, but it had to be that long to show you all you need to grow collard greens from sowing to harvest in the best possible manner.
I hope you got some value out of it. If so, make sure to share my article!
If you want to get even more information on growing collard at home, also make sure to have a look at my growing collard FAQ section.
Sources
https://en.wikipedia.org/wiki/Collard_(plant)
https://www.thespruceeats.com/what-are-collard-greens-995624
https://homeguides.sfgate.com/collard-varieties-73435.html
About the author
My name is Andreas and I’m really passionate about our environment and also about growing plants. In fact, I have grown several different plants over many years. I love to see my own plants grow and always try new things.
In my blog posts, I want to share my experiences with you so that you can become successful in growing various different plants, even if you are still a beginner right now.